Recently, I was asked to design and print a set of miniature tables and chairs, as well as the layout of the room these items of furniture reside in. This is to enable meeting planners to move these little printed chairs and tables and whatnot around, and then re-set the meeting room layout to suit the next meeting.
The tables and chairs need not be detailed, as long as the relative measurements of the items are correct. That’s fine, because that way I can work in Blender and scale everything relative to a table for example, and then just print sets of these at one go. The room furniture comes from Kinnarps, a leading manufacturer of such items. The dominant piece is the Trixagon table, and the cabinets in the room are hexagonal too.
So, off to Blender then. When you need a hexagon, it is actually a circle of only 6 vertices, and when you insert a circle, you can then reset the number of vertices to 6 before hitting Enter.

The Trixagon table consists of three hexagons. The easiest way to create this in Blender, then, is merely to duplicate the hexagon twice, and rotate it around the edge vertex, not the center. If you look at the image above, the Origin is now at the exact center of the object. That is usually the best location for it.
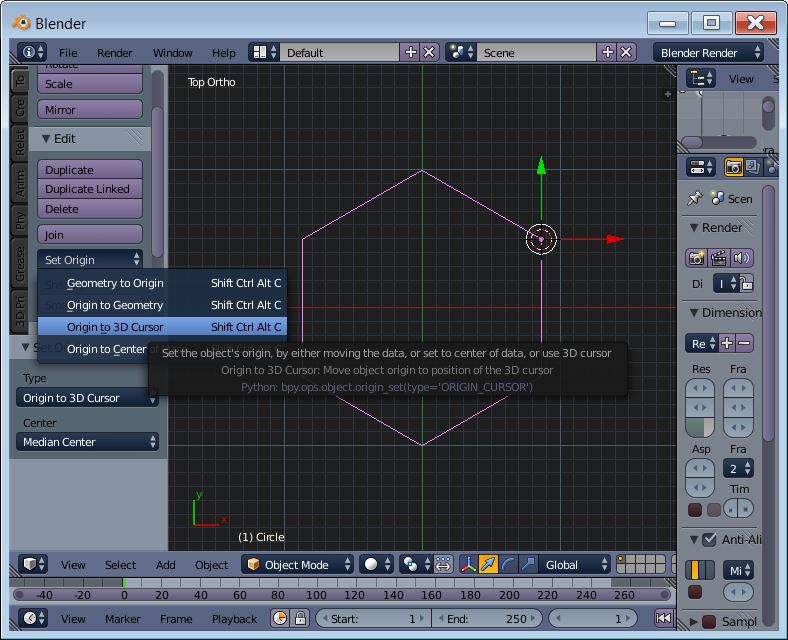
Rotation around the tip requires us to move the Origin (or pivot point, ie. the point around which the object revolves), to one of the tip vertices. Luckily Blender lets us handle that very neatly with the use of the 3D cursor. All you need to do is go to Edit mode, select the vertex you want to move the Origin to, and snap the cursor to it. When you go out of Edit mode, you can merely select Origin to 3D cursor, and hey presto – your object will rotate around that point now.

And with the Origin moved to the selected vertex:
After this, I add a face to the mesh. This is because it will be easier to add table legs, of which there will be three, if there is a face to which I can just snap the leg to. Then, I will use Shift-D and rotate the new copy 120 degrees.

Repeated once, I will have three faces at the right configuration:

I will now join these into one mesh to make the next moves easier. I select all three, and press Ctrl-J to join them.

The next thing is to add thickness to this. As I will not have to be very precise, I’ll just select the faces and extrude up by 0.15 units.

In the original table, the legs are spindly affairs that have wheels at the end. In this conceptual, quick’n’dirty model, we will dispense with such niceties and just add cubes at the centers of the hexagons. Once again, it is cool to move the 3D cursor to the center of the hexagon, then add the cube, and snap it to the hexagon. Repeat twice, then join the cubes with the hexagons to form just one mesh.

The other two are merely copies of the first, and snapping to the centers of the hexagons makes for easy align, and after that, the mesh is almost ready to be exported.

I have found that to export a good STL file, it is useful to scale the mesh by a factor of 30. Of course, I could set up the entire scale system to centimeters and work from there, but it is quicker to just scale it up, and then adjust to suit when the object is already on the printer’s table. So I scale, then export to STL, and then use the wonderful NetFabb STL checking service to make sure the mesh is printable.
It is now time to fire up the printer:

I use the Scale modifier on Repetier Host to make the mesh a little smaller. There is no point in making a large print in case something is wrong with it – this is just a proof of concept. Printing time will be 25 minutes, and this is the result:

So, what remains to be done is to model the floor layout (I am waiting for the person who requested this project to deliver the floor plan), then scale this table to the correct size, and then design the chairs around this table. When all is done, it is easy to use Repetier Host to create copies of objects on the printer table, and print multiple copies at one go. This saves the time of waiting for the table to cool before you can pick it off the table (just yesterday I chipped a glass plate when trying to pull an object off the glass too soon).
But from the start to finish, the time it took to make this 3D print is around 45 minutes.
![]()